
How to change Steam Deck case: parts and pricing guide
By Rocker Updated 10 min read
As an Amazon Associate I earn from qualifying purchases. That costs you nothing and does not decide what gets recommended. We also earn a commission from some links to partner brands (GearUP, World of Tanks, YUPLAY, GAMIVO).
On this page (9 sections)
In short: Changing a Steam Deck case means two different jobs: a cosmetic shell swap, which needs a full parts kit, or a new travel case, which costs a fraction and fixes most scuffs. For a shell swap, buy a kit matched to LCD or OLED, because the screws, adhesive and cables differ.
Part of our guide on how to expand steam deck storage
Nobody ranking for this query tells you the shell kit has three tiers, or that the trackpad dies at one specific step.
| Job one | Shell swap, full teardown |
|---|---|
| Job two | Travel case, no tools |
| Deck revisions | LCD and OLED differ |
| First step inside | Battery disconnect |
| Risky step | Screen adhesive release |
| Kit must include | Screws, adhesive, frame |
The short version
- A scuffed travel case is a fix; a scuffed shell is a full teardown with a parts kit
- LCD and OLED Deck shells use different screws, adhesive strips and button parts
- Remove the microSD card and disconnect the battery before anything else
- Screen adhesive release is the step that cracks screens and kills trackpads
- After reassembly, test triggers, trackpads, fan, touchscreen and power button before closing up
What you need
A shell swap on a Steam Deck is not a one-piece exchange. The shell arrives as several parts, and the old shell comes off in more pieces than most people expect. Gather everything before you start, because the teardown has points where you cannot pause halfway.
The one tool you cannot improvise is a set of plastic pry tools. Metal spudgers and screwdrivers gouge the old shell, and if you plan to sell the Deck one day, gouged plastic is the difference between a clean trade and a discount. A pry tool set with picks and a spudger costs little and does every plastic-clip job on the Deck.
Everything else on the list is either cheap or already in a drawer. Do not start until all of it is on the mat.
- Replacement shell kit matched to your Deck revision (LCD or OLED)
- Plastic pry tools: picks plus a spudger
- Small Phillips screwdriver (PH0/PH1)
- Isopropyl alcohol and lint-free cloth for adhesive residue
- A tray or magnetic mat for screws – they are not interchangeable
- Torch or good desk lamp

STREBITO Spudger Pry Tool Kit 11 Piece Opening Tools
Gives you a nylon spudger plus 4 opening picks to release the screen adhesive without gouging the shell, with a metal spudger held in reserve for stubborn clips.
Shell swap or new travel case: which job are you doing
The search phrase covers two purchases that share almost nothing. One is a protective carrying case, the zip-up thing the Deck lives in between sessions. The other is the shell, the plastic body of the console itself. People type 'case' and mean either, and the jobs differ by hours and by cost. The other half of this decision is steam deck case comparison.
If the damage is on the outside of the Deck, ask one question: is the plastic scratched, or is the console damaged inside? A scratched back panel and worn grips are cosmetic, but fixing them means a full teardown – battery out, screen off, everything transferred. A worn zip or a torn strap on a travel case fixes itself in the time it takes to unpack a new one.
For most scuffs, the travel case is the honest answer. A good hard-shell case protects against the next scuff too, which a pretty shell does not. Reserve the shell swap for cracks, warped plastic, sticky buttons, or a build you actually want to change – a colour swap or a translucent back. That is a project, and it deserves to be planned like one.
| Travel case | Shell swap | |
|---|---|---|
| Fixes | Worn zip, scuffed shell going forward | Cracks, colour change, worn grips |
| Teardown | None | Full: screen and battery out |
| Parts to buy | One case | Shell kit, often screws and adhesive |
| Risk | None | Screen, battery, ribbon cables |
| Time | Minutes | An evening, first time |
LCD or OLED: which parts match your Deck
Valve revised the Deck in late 2023, and the two revisions are not interchangeable where it counts. The OLED has a different screen assembly, different cable runs, and button parts that do not line up with the LCD shell. Sellers list shells as 'for Steam Deck' when they only fit one revision, and this is the single most common reason a kit comes back. There is more on custom firmware options in a separate guide.
Check before you buy, not after. The OLED model says OLED on the retail box and in Settings under System, and its screen has narrower bezels than the LCD. The LCD model shipped from 2022 with the thicker bezel and a matte finish option. Match the model, then match the kit.
The parts that differ are worth naming, because kits leave you short in exactly these places. Screw sets differ between revisions, so a generic screw pack may not have the right lengths for yours. The screen adhesive is revision-specific. Fan and speaker connectors sit in different places, so a shell moulded for the wrong revision leaves headers unreachable.
| Part | LCD Deck | OLED Deck |
|---|---|---|
| Screen | Larger bezel, LCD panel | Narrow bezel, OLED panel |
| Screen adhesive | LCD-specific strips | OLED-specific strips |
| Screw set | LCD lengths and positions | Different lengths in places |
| Fan and speaker | Different connector positions | Repositioned headers |
| Front frame | LCD moulding | OLED moulding |
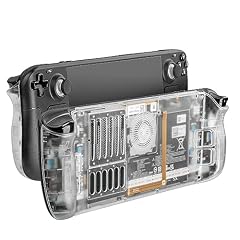
RGEEK Back Plate Shell Compatible with Steam Deck/Steam Deck OLED
Swaps your Deck's back shell for a transparent one with extra cooling holes, and the included tools cover the 8-screw removal, but it is a back plate only – no front shell or screen adhesive.
What to buy before opening the Deck
Shells ship in three levels of completeness, and only the top level is a real kit. The cheapest listing is a back panel alone, which suits someone replacing a cracked back and nothing else. The middle tier is a full shell – back panel and front frame – with no adhesive, which strands you at the screen step. The complete kit adds the screen adhesive strips and a matched screw set. It helps to understand reducing glare on steam deck screens before going further.
A complete kit for your revision is the one to buy. The front frame must come with fresh screen adhesive, because the old strips lose their stick the moment you peel the screen, and a screen held by tired adhesive will lift or rattle. Check the kit states the revision, includes adhesive, and lists the screws; if it does not, price the missing pieces before you commit.
One optional extra saves a headache on the OLED in particular: a replacement thermal pad. Repeated teardowns can compress or tear the pad between the APU and the heatsink, and a fresh pad of the right thickness keeps thermals where they were. It costs little and removes the temptation to reuse a pad that no longer sits flat.
| Kit level | Includes | What you still need |
|---|---|---|
| Back panel only | Rear shell | Everything else |
| Full shell | Back and front frame | Adhesive, matched screws |
| Complete kit | Shell, adhesive, screws | Nothing, if revision matches |
The swap, step by step
With the right kit on the mat, the swap itself is a patient teardown followed by a careful rebuild. Work slowly at the two points where decks get hurt: the adhesive under the screen and the connectors under the board. Everything else is screws and clips.
Power the Deck down fully, not to standby, and let it sit a few minutes. Work on a hard surface with the screws sorted by length as they come out – mixing them is how threads get stripped at reassembly.
- Remove the microSD card first. It sits near the edge of the board, and prying the shell with a card installed can snap it.
- Take out the back panel screws and lift the rear shell with a pry pick at the clips.
- Disconnect the battery connector before touching anything else. This is the step that makes the difference between a mistake and a fried board.
- Release the screen adhesive: warm the screen edge gently, work a pick under the glass from a corner, and slide slowly around the bezel. Never lever the pick against the screen itself.
- Lift the screen away and set it face-down on something soft, then unplug its ribbon cable.
- Transfer the board, fan, buttons and trackpads into the new front frame, fitting the new adhesive strips to hold the screen.
- Reconnect the screen cable, reconnect the battery last, and refit the back panel with the correct screws in the correct holes.
Checks after reassembly
Do not close the back panel until the Deck has passed a short test routine. Reassembly mistakes almost always show up in the same handful of places, and catching one now costs a minute; catching it after the final screws means another teardown.
Boot the Deck and work through the inputs in order. Press both triggers through their full travel and feel for crunchiness. Drag a finger across each trackpad, then click each one at its corners – a trackpad that does not click is the classic sign of a ribbon cable seated crookedly. Test every face button and both thumbsticks.
- Listen for the fan spinning up under load – silence means the fan header is loose
- Tap across the whole touchscreen; dead zones mean the screen cable is not fully seated
- Press the power button several times and watch for a clean sleep and wake
- Check the volume buttons and headphone jack before final closure
Common mistakes with a Steam Deck case swap
Every one of these has cost somebody their Deck. They cluster around two themes: rushing the parts check before buying, and rushing the physical steps that have no second chance. Read the list before you order, then read it again before you pick up a pry tool.
The pattern in the mistakes is consistency – most of them are avoided by the same two habits, checking revision numbers and disconnecting the battery early. Do both and you remove most of the risk in the job.
- Buying a kit without checking LCD or OLED -> confirm the revision on the box or in Settings first
- Forgetting the microSD card -> remove it before the first screw
- Working with the battery connected -> disconnect the battery connector as the first internal step
- Prying the screen against the glass -> lever only against the frame, with heat and patience
- Reusing old screen adhesive -> fit the fresh strips from the kit
- Testing after the last screw -> run the full input check before final closure
For most scuffed Decks, a new travel case is the better purchase; save the shell swap for cracks or a build you genuinely want.
Questions people still ask
How long does a Steam Deck shell swap take first time?
Plan on an evening rather than an hour. The teardown and rebuild are straightforward, but the adhesive release and connector work reward slowness. A second swap on the same Deck goes far quicker because you know where every clip and cable sits.
Can I swap just the back panel instead of the whole shell?
Yes, and it is the sensible move if only the back is cracked. The back panel comes off with screws and clips and no screen work at all. A back-panel-only kit costs far less and removes most of the risk from the job.
Does swapping the shell void the Steam Deck warranty?
Opening the Deck can affect warranty coverage, so check Valve's current terms and your purchase date before starting. If the Deck is still under warranty and the fault is covered, a warranty claim is the better route than a cosmetic swap.
Why did my trackpad stop clicking after the swap?
Almost certainly a ribbon cable seated at a slight angle. Reopen the front frame, unplug and firmly reseat the trackpad cable, and test again. This is the most common reassembly fault and it fixes itself in a minute.
Is a third-party shell as tough as the original?
Quality varies between sellers, so read reviews for fit and finish rather than assuming. Reputable kits use similar plastics to the original, but tolerances on clips and screw bosses vary, and a poor fit shows up as creaks or uneven gaps around the screen.